Image-based design
Digital Photography
The Photographer’s Eye
Digital Photography
The Photographer’s Eye
- John Szarkowski, 1966
The Camera
The camera functions much like the human eye.
You will learn to use your photographic eye and how to think before taking a picture. You need to understand what a photograph is composed of and what the visual criteria are to judge it by. By using categories described by John Szarkowski in a book The Photographer’s Eye, you will see that artists make conscious decisions when designing a photograph and you will too.
I. The Thing Itself
Concentrate on the subject matter you are portraying. Photography focuses on the actual. The photographer’s challenge is to recreate the image as close to the facts as possible. This is important because the photographic image lasts longer than the actual subject and is the remembered reality. Make the viewer believe that the photograph is true.
II. Details
The photographer looks at the facts of things. He/she focuses on forcing the facts to tell the truth. The job of the photographer is to isolate a piece and document it. The details give clues to a bigger picture. The details teach us that if a photograph could not be read as a story, it could be read as a symbol. What details lead the viewer’s eye throughout the photograph? Consider color, value, light, texture and patterns and how they provide visual stimulation.
III. Framing/ Cropping
The photographer’s picture is selected. He/she chooses what to allow into his/her frame and what to take out. The photographer controls where the edges of the image will be and what part of the scene surrounding will be involved in the picture. The picture's edge crops the image. If a photographer chooses to isolate and focus on two people in a crowd he/she creates a relationship between those people who may or may not know each other. This act of taking away subject matter forces the viewer to concentrate on what the photographer wants them to see. Depending on how the picture is taken, it may leave the viewer wondering what lies beyond the picture plane.
IV. Time
The photograph describes a particular amount of time or the period of time in which it was made. Time is always present. Movement the camera captures with a slow lens or film sometimes reveals a ghost or a blur; if photographed at a higher speed will freeze an action in time. A sequence of events may suggest time passing. Direction and strength of light may suggest time of day. Patterning of lines and shapes due to light may also suggest the time of day and its passing.
V. Vantage Point
Photography has taught us to see from unexpected viewpoints. The vantage point allows for the viewer to gain a sense of the scene, emotion or mood but is not necessarily given the whole story. Consider the angle you choose to photograph from. Consider how it will influence one’s understanding of your photograph. How does it change the meaning of the photograph if the same image is taken from a bird’s eye view (looking down) and then a worm’s view (looking up)? Will it change the mood or meaning? How does your subject change? Is it distorted? Does the lighting change? How does it appear differently? Will it change the relationship of power between your subjects?
We will take digital photographs in order to learn how to upload them to the Mac. You will be asked to create a folder for your photos and save it to your thumb drives. You will use these images for future projects.
Loading your digital photos onto the MAC....
• Plug your digital camera into your computer via USB cable or connector it came with. Be sure your camera is set to view images.
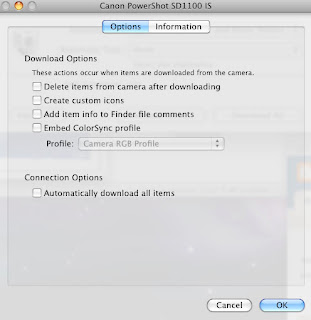
Image Capture
Import Photos:
Import Photos:
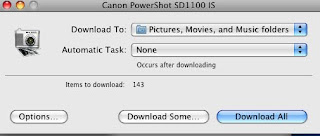
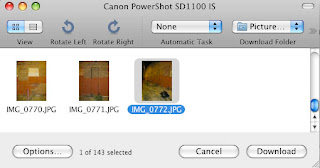
• Make multiple selections by holding shift.
• You can either download them by clicking DOWNLOAD at the bottom or drag them into a folder prepared on your desktop.
I Photo
Import Photos:
• Open iPhoto; the application switches to Import mode.
• Type a name and description for your import in the Roll Name and Description fields, respectively.• Click Import.
Learn more here:
http://support.apple.com/kb/HT2481
Import Photos:
• Open iPhoto; the application switches to Import mode.
• Type a name and description for your import in the Roll Name and Description fields, respectively.• Click Import.
Learn more here:
http://support.apple.com/kb/HT2481
Image Retouching:
http://www.efuse.com/Design/image-retouch.htm
PhotoShop Tools
The Photoshop toolbox, is located by default on the left hand side of the screen.
Any tool button that contains a small arrowhead has additional tools. To access this submenu of tool choices, simply hold the mouse button over the black arrow on the corner of the tool.
Tools references:
http://simplephotoshop.c om/photoshop_tools/index.htm
http://www.freetimefoto.com/photoshop_cs3_toolbox
http://www.photoflashgraphics.com/photoshop_tools.htm
http://www.photo-i.co.uk/Technique/Photoshop_Dodge.htm
http://tutorialblog.org/photoshop-basic-tools-overview/
Working with PhotoShop Layers:
See
http://www.elated.com/articles/introduction-to-layers/
for detailed description of layers.
Blending Modes and Opacity:
See
http://www.northlite.net/ps/blend.htm
for detailed description of blending modes.
See
http://iit.bloomu.edu/vthc/Photoshop/SpecialEffects/opacity.htm
for detailed description of opacity.
Tutorial:
http://www.photoshopsupport.com/tutorials/jf/blending-modes-and-opacity/photoshop-blending-modes-and-opacity.html
Clone Stamp Tutorials:
http://iit.bloomu.edu/vthc/Photoshop/enhancing/cloningstamp.htm
http://www.ehow.com/video_4444802_photoshop-clone-stamp-tutorial.html
Posting PhotoShop Images to the Blog:
In order to post tutorials and assignments to your blog be sure to save them in PhotoShop as an RGB file at a 72 Resolution and as a JPG file.
PhotoShop Threaded Image
Thread and layer per sonal photos or artwork together to create a panora mic image. The clone stamp and eraser tools will be necessary for this exercise. (1 color copy due, Letter or Tabloid size depending on image)
Guidelines:
• Complete threaded image exercise. Save and print it in color (2 hard copies- one to be collected, one to keep).
• Post to your blog.
PhotoShop Tools
Toolbox Diagram

Any tool button that contains a small arrowhead has additional tools. To access this submenu of tool choices, simply hold the mouse button over the black arrow on the corner of the tool.
Tools references:
http://simplephotoshop.c om/photoshop_tools/index.htm
http://www.freetimefoto.com/photoshop_cs3_toolbox
http://www.photoflashgraphics.com/photoshop_tools.htm
http://www.photo-i.co.uk/Technique/Photoshop_Dodge.htm
http://tutorialblog.org/photoshop-basic-tools-overview/
Working with PhotoShop Layers:


http://www.elated.com/articles/introduction-to-layers/
for detailed description of layers.
Blending Modes and Opacity:

http://www.northlite.net/ps/blend.htm
for detailed description of blending modes.

See
http://iit.bloomu.edu/vthc/Photoshop/SpecialEffects/opacity.htm
for detailed description of opacity.
Tutorial:
http://www.photoshopsupport.com/tutorials/jf/blending-modes-and-opacity/photoshop-blending-modes-and-opacity.html
Clone Stamp Tutorials:
http://iit.bloomu.edu/vthc/Photoshop/enhancing/cloningstamp.htm
http://www.ehow.com/video_4444802_photoshop-clone-stamp-tutorial.html
Posting PhotoShop Images to the Blog:
In order to post tutorials and assignments to your blog be sure to save them in PhotoShop as an RGB file at a 72 Resolution and as a JPG file.
Saving your work in Photoshop:
In PhotoShop first save your image to your thumbdrive, disk... as a Photoshop file (.PSD) so that you can continue to work on the various layers if need be.
Posting your work in progress as well as your completed work on the Blog:
• Before saving-- IMAGE>IMAGE SIZE (make sure the resolution is set at 72)
• IMAGE>MODE (make sure it is set to RGB)
• Compress your file-- FILE>SAVE AS (Title your work, under WHERE be sure to select your thumbdrive, disk..., under FORMAT select JPEG (.JPG)
• Edit Post on Blogger.
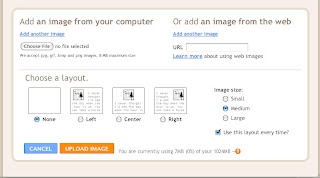
• Add Picture by clicking this icon: 
• Select the following information:
• Click "Done" Once your image has been uploaded.
• Place it by dragging the image with your mouse to the appropriate spot or copy and paste the image to reposition it.PhotoShop Threaded Image

Thread and layer per sonal photos or artwork together to create a panora mic image. The clone stamp and eraser tools will be necessary for this exercise. (1 color copy due, Letter or Tabloid size depending on image)
Guidelines:
• Complete threaded image exercise. Save and print it in color (2 hard copies- one to be collected, one to keep).
• Post to your blog.
No comments:
Post a Comment