Write two or three paragraphs, no more than a page, describing why you are an artist/graphic designer and why you make art. You may wish to discuss specifically the art you create or the field in which you wish to enter. Many applications require you to explain and demonstrate how sincere and dedicated you are to art. In addition to acting as a sample of your communication skills and professionalism it offers an opportunity for juries and admissions staff to get a better understanding of you and your personality.
Consider:
• A crucial point when you realized you needed to be an artist/designer
• Your inspiration to express yourself visually
• Goals and aspirations for the future, etc.
Graphic Design Portfolio
3 types of graphic design portfolios: printed, online, and a DVD or CD
1) The Print Portfolio...
Coil bound book/case where you can add and take out pages.
You can then customize your portfolio for each kind of job that you apply for.
Black, often the color of choice, sets off the samples with strong contrast. Pages should turn easily, and the book itself should be big enough to give some breathing room for your samples.
Consider the type of job you are applying for when choosing your works. Does it require more photo manipulation skills or more typography?
http://www.youthedesigner.com/2008/06/30/12-steps-to-a-super-graphic-design-portfolio/
2) Online Graphic Design Portfolio
3) CD or DVD Portfolio
Digital Portfolio
A Power Point presentation that includes your professional information and images of your artwork is helpful. In the future you will be asked to submit portfolios of your work for competitions, grant proposals, internships, scholarships, galleries, admission to graduate school as well as for employment.
Art Samples
Include your strongest graphic design assignments, which may be related or may vary in medium and subject. Scan your work in Photoshop or use images taken with a digital camera to achieve clear accurate reproductions of artwork. If you decide to use sketchbook pages,consider cropping or including the presentation of two consecutive pages in one image.Clean up dust, dirt and fingerprints that do not belong.
Be creative. Consider using effects, transitions, animations and sounds. Your Power Point presentation should incorporate your content in a fluid manner. The goal is to acquaint you to Power Point and communicate using presentations.
Each image should be saved as a JPEG file at a resolution (dpi) of 72 and no larger than 8”x10”. Artwork will display well if it is set on a single (neutral) colored background (such as black, gray, off-white or white). Write the title, the size, the medium and the date of the art’s completion next to, below or above the image.
4- Artist Resume: http://www.collegeart.org/guidelines/
Go to the College Art Association web site. This site can be useful as a resource for structuring your resume. Click on the link: artists resume. It has a detailed description of how to create an appropriate artist resume.
• At this early stage in your career as artists, you will need to include such information as: education- high school, your starting date at Moore, Saturday art school programs, high school art classes and clubs, art related school community projects and programs, any exhibitions you took part in (including at Moore and the student gallery), scholarships and other related awards you’ve earned… If there is a category that is not appropriate to your experience you may omit it for your resume.
5- Hyperlink to Blog
Visit my personal blog spot at…
•Explore Power Point. Information is in the packet. Use the information you have obtained on various programs throughout the course to create a dynamic presentation.
Example:


Power Point Tips:
Correcting your images in PhotoShop
Use PhotoShop to create an accurate digital portfolio.
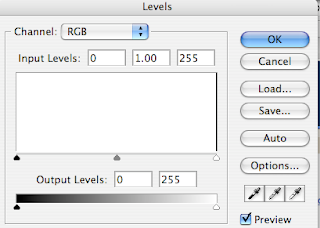
Under the IMAGE menu> ADJUSTMENTS> LEVELS and adjust the light levels.
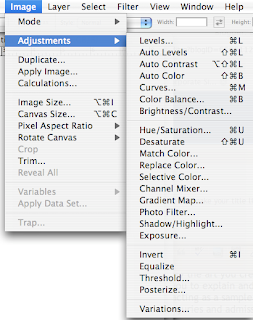
The three sliders on the Levels tool adjusts the light levels of your image.
Correcting your images in PhotoShop
Use PhotoShop to create an accurate digital portfolio.
Under the IMAGE menu> ADJUSTMENTS> LEVELS and adjust the light levels.

The three sliders on the Levels tool adjusts the light levels of your image.

• Right Slider: Highlights
• Middle Slider: Middle Tones
• Left Slider: Shadows
This is useful for images that lose any details in specific areas like the middle grays or shadow areas.
Another option is to simply alter the brightness and contrast controls when a less complex edit is called for.
• Middle Slider: Middle Tones
• Left Slider: Shadows
This is useful for images that lose any details in specific areas like the middle grays or shadow areas.
Another option is to simply alter the brightness and contrast controls when a less complex edit is called for.

Also, the Hue/Saturation tool allows you to generally adjust the color.

Clicking on the arrow next to the EDIT window where MASTER is, you can choose specific colors to adjust, rather than all of them.
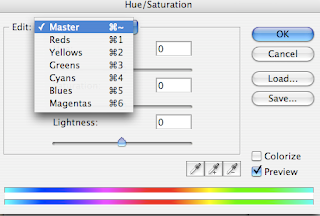
This is useful when one color seems incorrect. You can also adjust the SATURATION and LIGHTNESS here.
How to use Power Point 2008:
http://www.microsoft.com/mac/help.mspx?app=3
See options on side menu for further information
Information below is taken from above URL and modified to suit the needs of this assignment.
To create a basic presentation or your own template:
Slide master: Automatically adds a slide master to the first slide in your presentation. Any change you make to a slide master is reflected on each slide or layout that is associated with it.
Slide layout: Defines positioning and formatting for text and objects that appear on a slide. Choose the layout that best suits the slide you are creating. You can create your own custom layout.
Choose the right layout for your slide
(Taken from http://www.microsoft.com/mac/products/powerpoint2004/using.aspx?pid=usingpowerpoint2004&type=howto&article=/mac/library/how_to_articles/office2004/ppt_layout.xml)
A PowerPoint for Mac presentation typically includes slides arranged in a variety of layouts. While some slides contain text only, others might include a chart or two, and still others contain text and pictures. Rather than design a slide from scratch, you can save time by choosing one from the collection of slide layouts that is built into PowerPoint.
The layouts are designed to work in conjunction with the design templates. The design template controls the overall look of the slide, whereas the slide layout affects the arrangement of specific elements on an individual slide.
• Create a new slide based on a slide layout
On the Formatting Palette, under Add Objects , click the Slides tab.
If the Formatting Palette is hidden, click Formatting Palette on the View menu. 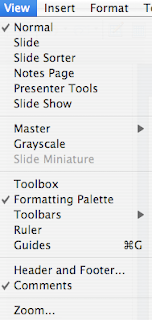
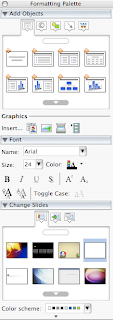
• Click the slide layout thumbnail you want.
A new slide appears, arranged like the thumbnail layout you chose.
The new slide contains boxes, called placeholders, that indicate where information will go. Each placeholder displays a line of instructions, like those in the following picture.
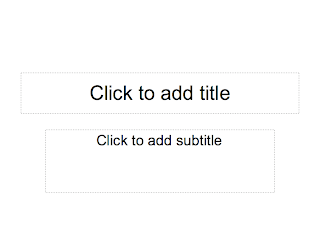


• Click the slide layout thumbnail you want.
A new slide appears, arranged like the thumbnail layout you chose.
The new slide contains boxes, called placeholders, that indicate where information will go. Each placeholder displays a line of instructions, like those in the following picture.

To populate the placeholders with your own information, click or double-click the placeholder as indicated and enter the information you want on the slide.
You can also apply a different layout to an existing slide. Any information you have already entered on the slide is automatically reconfigured to match the new layout.
You can also apply a different layout to an existing slide. Any information you have already entered on the slide is automatically reconfigured to match the new layout.
Apply a different layout to existing slides
In normal or slide sorter view, select the slides you want to change.


On the Formatting Palette, under Add Objects , click the Slide Layout tab. To apply a different Slide Design, on the Formatting Palette, under Change Slides, click the Slide Design Tab.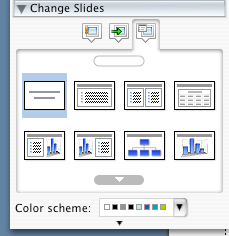


• Click the slide layout thumbnail you want.
Theme: Creates a unified look for your presentation by using colors, fonts, backgrounds, and graphics that complement each other. Power Point opens up with a specific theme but you can change it anytime.
Theme: Creates a unified look for your presentation by using colors, fonts, backgrounds, and graphics that complement each other. Power Point opens up with a specific theme but you can change it anytime.
Theme colors: Uses a different color for each element on a slide, such as the text, hyperlink, and background. Choose your colors for each slide element to unify the look of your presentation.
Adding new slides
Continuing adding slides with layouts that suit your needs. Create slides that will show off your work in the best light. Images of your work must be corrected in PhotoShop, set at 72 dpi and saved as a .jpg files. Customize your slides based on what colors, layout, background… will look best with your work.
•View menu> Normal
•In the top of the left pane, click the Slides tab> choose the slide next to where you want to insert the new slide. Drag a slide to reposition it if needed.
• Elements Gallery> Slide Layouts tab
(The Elements Gallery is below the standard toolbar.)
•Insert new slide> Elements Gallery> choose the slide layout that you want.
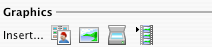
Adding or replacing a picture
Add a picture
• Click where you want to insert the picture
• Insert menu> Picture
• Browse the picture that you want to insert> Insert
Add clip art
• Insert menu> Picture> Clip Art
• Browse the clip art that you want to insert>Insert
Replace a picture
• Click the picture that you want to replace and follow the above instructions.
Images may also be inserted from the Formatting Palette under Graphics:
Inserting Transitions
Transitions move one slide to the next using an effect during a slide show. You can add a transition to just one slide, different transitions to different slides, or the same transition to all slides.
• Be sure to be in Normal mode on the View menu.
• In the left pane, click the Slides tab, and then click the slide that you want to apply the transition to.
• To select multiple slides, hold down Apple/⌘ as you click the slides.
Transitions move one slide to the next using an effect during a slide show. You can add a transition to just one slide, different transitions to different slides, or the same transition to all slides.
• Be sure to be in Normal mode on the View menu.
• In the left pane, click the Slides
• To select multiple slides, hold down Apple/⌘ as you click the slides.
• Go to Elements Gallery> Transitions tab> click the transitions that you want to use
Change the Speed
• Go to Elements Gallery> Transitions tab> Options
• Under Effect> Slow, Medium, or Fast> Apply
• To apply the changes to all slides in the presentation, click Apply to All.
Add a Sound
• Go to Elements Gallery> Transitions tab> Options
• On the Sound pop-up menu> Sound effect> Apply
• To apply the changes to all slides in the presentation, click Apply to All.
How to Advance Slides
• Go to Elements Gallery>Transitions tab> Options
• Under Advance Slide, select the On mouse click or the Automatically after seconds check box, and then click Apply.
• If you select Automatically after seconds check box, type the number of seconds.
• To apply the changes to all slides in the presentation, click Apply to All.
Deleting Transitions
• Normal mode should be selected on the View menu.
• In the left pane, click the Slides tab, and then click the slide that you want to delete the transition from.
• To select multiple slides, hold down Apple/⌘ as you click the slides.
• Go to Elements Gallery> the Transitions tab> No Transition
Note: When you delete transitions, PowerPoint resets all the options you selected in the Transition Options dialog box.
Apply a transition to all slides
Transitions make moving between slides more visually interesting.
• Go to Elements Gallery> Transitions tab

• Choose your transition.

• Click Options

• In the Transition Options dialog box, click Apply to All.

Hints
• You can also change the speed of the transition in the Transition Options dialog box.
• When you click Apply in the Transition Options dialog box, it applies only to the current slide selected
See Make Slides Come to Life with Transitons and Animations Course on Side menu of http://www.microsoft.com/mac/help.mspx?app=3 under Transitions.
Change the Speed
• Go to Elements Gallery> Transitions tab> Options
• Under Effect> Slow, Medium, or Fast> Apply
• To apply the changes to all slides in the presentation, click Apply to All.
Add a Sound
• Go to Elements Gallery> Transitions tab> Options
• On the Sound pop-up menu> Sound effect> Apply
• To apply the changes to all slides in the presentation, click Apply to All.
How to Advance Slides
• Go to Elements Gallery>Transitions tab> Options
• Under Advance Slide, select the On mouse click or the Automatically after seconds check box, and then click Apply.
• If you select Automatically after seconds check box, type the number of seconds.
• To apply the changes to all slides in the presentation, click Apply to All.
Deleting Transitions
• Normal mode should be selected on the View menu.
• In the left pane, click the Slides
• To select multiple slides, hold down Apple/⌘ as you click the slides.
• Go to Elements Gallery> the Transitions tab> No Transition
Note: When you delete transitions, PowerPoint resets all the options you selected in the Transition Options dialog box.
Apply a transition to all slides
Transitions make moving between slides more visually interesting.
• Go to Elements Gallery> Transitions tab
• Choose your transition.
• Click Options
• In the Transition Options dialog box, click Apply to All.
Hints
• You can also change the speed of the transition in the Transition Options dialog box.
• When you click Apply in the Transition Options dialog box, it applies only to the current slide selected
See Make Slides Come to Life with Transitons and Animations Course on Side menu of http://www.microsoft.com/mac/help.mspx?app=3 under Transitions.
Inserting Animating Effects
Animate text and objects
• Select the text or object that you want to apply an animation. For example — you can fly in text bullet points from the left, one word at a time, or add the sound of applause to a picture when it is uncovered. to.• Animation applies to all text in a text box or placeholder- a box with a dotted outline that appears when you create a new slide. Placeholders reserve a space for such objects as the slide title, text, charts, tables, organizational charts, and clip art. For example, if you add an animation to a bulleted list, the animation applies to all the text in the bulleted list placeholder but not to the title text, which is in a separate placeholder.
• On the View menu> Custom Animation
To animate/Click
How the object or text enters/ Add Entrance Effect
How the object or text appears/ Add Emphasis Effect
How the object or text exits/ Add Exit Effect
effect that you want.
Sounds and movies/ Add Media Actions
Note: Sound and movie animation effects are available if you select a sound or movie file on the slide.
On a Mac in PP 2008, you can play motion path- the path that a specified object or text will follow as part of an animation sequence for a slide. To preview the animation, click Play
• To change the order of animations, click one of the arrows to move it up or down in the list
Inserting Sound
Add and format sound in a presentation
You can add any sounds that are located on your computer, including sound files or songs from your music library.

• Click the slide that you want to add sound to.
• Click Media
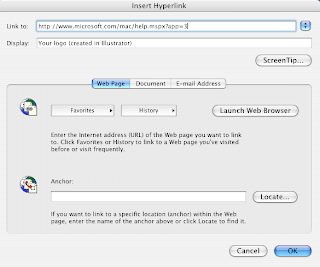
• Select and highlight text or an image that you wish to add a Hyperlink to. (In our case it is the Blog’s URL at the end of the slides.)
• Insert menu> Hyperlink
• Link to> Paste the URL> OK
Posting your Portfolio to your Blog:
• Title your new post> Digital Portfolio
• Copy and paste your artist’s statement.
• Copy and paste your artist's resume.
• In PowerPoint go to View menu>Notes Page.
Posting your Portfolio to your Blog:
• Title your new post> Digital Portfolio
• Copy and paste your artist’s statement.
• Copy and paste your artist's resume.
• In PowerPoint go to View menu>Notes Page.
• Here you can scroll down each slide using the side bar. On each page take a picture of only your slide by holding down Apple/Command, Shift, and 4. You will target the slide and drag over it to copy the image. The image should appear on your desktop. We have done this before with our timelines. Starting from the last slide up will place them in the correct order on the blog-- it is more efficient this way.
• Upload the pictures to your blog and arrange them if need be.
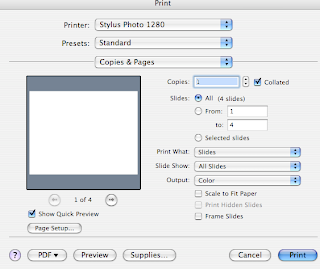
Printing a hard copy to hand in:
Print a hard copy by choosing FILE> PRINT> Make the correct selection for the printer (Color 34) and amount of copies> go to PRINT WHAT and choose multiple slides per page (you can choose from 2 - 9 slides- try to sum your power point up in two pages)

Printing a hard copy to hand in:
Print a hard copy by choosing FILE> PRINT> Make the correct selection for the printer (Color 34) and amount of copies> go to PRINT WHAT and choose multiple slides per page (you can choose from 2 - 9 slides- try to sum your power point up in two pages)

No comments:
Post a Comment